Hard drive space isn’t necessarily expensive, that is until you consider the amount of disk space required to archive your 300+ disk DVD collection to your Media Center pc. With each regular DVD clocking in at around 4gb, let’s not even mention bluray disks, the cost can add up quickly.
So what we need is a way to compress those movies while keeping the quality but saving some space (and cash!). This is where a little program called Handbrake comes in. Handbrake is an open-source program free to download from their site for a variety of platforms.
At first glance the user interface may seem slightly confusing but it’s actually quite a simple affair to get started with some basic DVD ripping (DVD encryptions are not circumvented by Handbrake and will require a separate program such as AnyDVD from Slysoft).
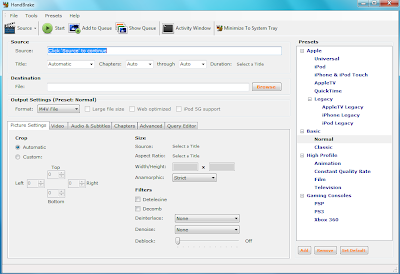
Step one after you’ve inserted your original DVD is to set Handbrake to the appropriate source. To do this simply click the source button located at the upper left hand corner of the interface and select your DVD from the dropdown menu that appears.

Handbrake will then scan the disk for track information and select what it believes is the main track containing the movie. If you believe for some reason it has selected incorrectly you can adjust the selection under the drop box labeled “Title.” Then under “Destination” hit the browse button to set the location you want your compressed DVD file to be located.
Next we set our video and audio settings, including the amount of compression we want on our disk. These settings will effect the quality of the file we get back, more compression means a lower quality file being output. Picture settings can typically be left at their default settings unless you have a particular reason for changing a setting such as deinterlacing or noise reduction. Selecting the Video tab will bring up the options for video compression that we will be looking at first.
Here we can set either the output size or the average bitrate of the output file we want. Typically a 1/4 compression will result in minimal picture loss, for a typical DVD 850mb-1gb is generally a good range for the target output size. Entering a target size in MB will tell the program to automatically calculate the average output bitrate making our task a little simpler on us. Then we can move on to the audio settings.
On this tab you can select your audio encoding preferences, high quality audio isn’t a problem when encoding DVDs to your hard disk as the audio will only add a few megs to the output size. Selecting AC3 under the Audio Codec drop box will set the output audio to a format that will lose no data from the original DVD and is an optimal setting.
Finally, hit the Start button located at the top and the conversion process will start. A cmd dialog will appear and show you the status of your encoding. This process can take anywhere from an hour to several depending on how powerful your pc and the settings you’ve chosen. Once the dialog has closed your encoding is complete and you can navigate to your destination directory to give it a play and be sure the output is to your liking.
There are a large number of additional options in Handbrake not covered here that you are free to play around with including a number of presets on the right hand side. At this point, however, that is up to your own experimentation, have fun!

 |
Leave A Comment

Tagged As: codec, dvd, handbrake, movie library


Post a Comment