Convert Single Video Files or Create a Queue with Handbrake

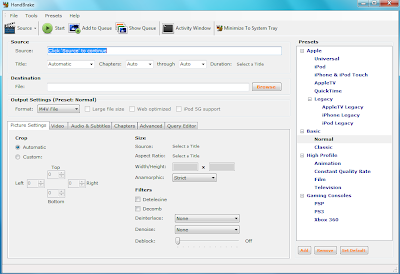
handbrake Need to convert a video or two into a different format? Have some MKV files you’d like to play on an extender as MP4 files? Handbrake has the solution for you. Handbrake is a free, open-source program with more features for converting and encoding video than you’ll likely ever need. The interface, however, is easy enough to for basic users to jump right in.

To get started you’ll need to download and install a copy of Handbrake. It’s available for a number of platforms including Windows, OS X and Linux. Command line versions are available as well but for this we will be using the Windows GUI version. Once you’ve got Handbrake installed open up the GUI by selecting HandBrake from the programs menu.

Once inside the first thing we need to do is select the source video. To do this press the “Source” button in the toolbar then select “video file” from the drop down menu. Next set the output file in the Destination File input, you may either select the output type in the Save as type drop down box in the file save window or select the type in the main window.

Configure Video Source

After setting your source and destination files, make sure that the Format listed under Output Settings is set to the correct format. If you are converting videos to use on an extender it will most likely be necessary to select an MPEG-4 Codec on the video tab. Switch to the Video tab and select “MPEG-4 (FFmpeg)”. For converting to MPG4 to play on an extender these are the most compatible settings to use.

Select Video Codec to Use

To begin converting a single file simply select “Start” from the toolbar. For multiple conversions you may want to setup a queue, which will allow you to add multiple source videos and output files to a batch process. Settings for each conversion can be set individually, simply press “Add to Queue” then go through the same steps for each video.

When you’ve finished adding videos to the queue, press the “Show Queue” button to bring up the queue listing. Check to make sure there are no errors in the listing, for instance non-alphanumeric characters in filenames will cause blank entries. These should be removed and re-entered so as to not cause problems in the process.

Video Conversion Queue

From the “Show Queue” window you have the option to begin the conversion process by pressing the “Encode” button. Alternatively, you can save or load Queues from the “Queue” drop down box. Also, you will be given the option to create a .bat file which can be executed from outside the Handbrake GUI. This .bat file can be used to run a scheduled task or for any other reason you may want to do a batch conversion without the GUI.

That’s all there is to doing some basic conversion using Handbrake. Simple to use with plenty of extra options, including advanced options for h.264 if you should choose to use a compatible codec. The ability to setup conversion queues and batch files for scheduled processing make the possibilities even greater. Include the fact that this is free, open-source software and there’s no reason to not give Handbrake a try.

You can use Handbrake to rip video from your DVDs too, check out this guide on Bringing DVDs to your Media Center with Handbrake!

Batch Convert AVI and MP4 files into MKV format

Convert AVI MP4 to MKV Continuing to get your movie collection in order you may find yourself wanting to change order encodes such as AVI or MP4 files into an MKV format. For instance, the easiest way to bypass the new Windows Media Foundation framework inside of Media Center is to use a non-native format such as MKV. Of course, this will also break support on Media Center Extenders as most often they will not support the MKV format.

Converting each movie from it’s current format to another using traditional means can be a task that many would give up before even starting. The idea of converting each file one by one can be daunting for those with large collections. That’s where these files and guide can come in handy. This will enable you to do a batch processing of AVI and MP4 files into MKV files.

Get the tools

Before we get started you will need a couple of items downloaded and installed. The first of which is MKVToolnix, this set of tools will provide the command line program used by the .bat file to convert any AVI or MP4 files which don’t include WMA audio. Install the program using the installer provided on the MKVToolnix website.

Second, this zip file, which includes a .bat file and a directory which should be placed in your movies directory. Also, these files are marked “Hidden” by default and necessity, you’ll need to enable hidden items which you can find instructions for here.

Getting Started

Once you have installed MKVToolnix and extracted the zip file to your movies directory you will need to move all your AVI and MP4 files to the main directory if they aren’t there already. The simplest way to accomplish this is to enter a search in Windows Explorer for .avi/.mp4 and cut/paste into the main directory.

Windows Explorer Search

This is done due to the fact that the .bat file doesn’t use recursive directory codes. There are four different versions of the batch file included in the zip.

  1. Just Convert – Will convert any AVI and MP4 files to MKV
  2. Convert and Move - Will convert to MKV then move to a directory with the same name as the file's name
  3. Convert and Delete - Wil convert to MKV then delete the original AVI/MP4 files
  4. Convert, Move and Delete - Will convert to MKV, move to folders then delete the originals

During conversion, if the file is able to be converted by MKVToolnix’s MKVMerge it will be. This is the fastest method of converting the files to the MKV format as it simply re-muxes the file into an MKV. If the original file uses WMA for audio, however, the conversion will not occur with current versions of MKVToolnix. Support for these files is planned for later versions.

Also, included is a version named simply “avitomkv.bat”. This version includes the ability to convert files encoded with WMA audio by using the HandbrakeCLI from Handbrake.fr. This version is the most robust as it will re-encode all files, however, during this process the original files are deleted. This isn’t optional in this version and is irreversible, use with extreme care!

Stick with Hack7MC

Hopefully, this guide will get anyone looking to do a batch conversion of their media where they need to go. This little .bat file saved me much time recently converting a sizable collection of AVIs to MKV in order to circumvent Windows Media Foundation in Media Center.

Check out more Tips to Organizing Your Movie Collection on Hack7MC!

Media Browser Beta 11: New Vanilla Theme Facelift

Media Browser 11 The latest update to Media Browser, the popular movie library add-on for Windows Media Center, gives the plug-in a bit of a facelift. Though not enabled by default a new theme has been added to the options inside Media Browser. If you haven’t tried this wonderful program yet now is the perfect time to do so. Download the latest version of Media Browser from mediabrowser.tv’s forums.

enter

Once you’ve got a copy of the latest version of Media Browser installed you will need to enable the new theme from inside the plug-in. At this point the configuration program included with Media Browser is fairly slim but hopefully at some point it will include more configuration options outside of Media Center. Instead, open up Media Browser inside Media Center’s Extras Library then click the small wrench icon to open the configuration then Navigate to the themes section and select Vanilla from the Visual Themes.

enable_vanilla

Once you’ve got your theme set to Vanilla you’ll notice a drastic difference in Media Browser’s appearance. This new theme adds quite a bit to the visual style of Media Browser’s various view options. All the view styles have been converted over to the new Vanilla theme including a new view specifically for Vanilla called Strip. Most of the options from the default Media Browser theme are available through the wrench icon in the Vanilla theme, however, to have access to the wrench from folder views you will need to enable it from the config options under Vanilla.

view_options

Under the new Vanilla theme, fan art is a much more prominent feature of each view. You will immediately notice that, while the default theme kept fan art fairly low key, this new theme displays fan art as a full screen background to each view. Though some of the views are much better suited to this new style than others such as the recently introduced Coverflow view.

coverflow

To have access to the sort and filter functions you will once again need to have the wrench icon displayed on each view. This can be somewhat distracting depending on the view style though it is apparent that consideration was taken to custom tailor the wrench placement for each view. Once you have the icon displayed clicking it will bring up the options for sorting and filtering the current view.

config

This new theme definitely adds a lot of flair to the Media Browser interface and is a welcome addition to the default package. There are a few issues with the theme that I would like to see addressed, however. Adding a better integrated method of accessing the sort and filter options being first on the list. Secondly, on certain views the selection box contains a blue background which can be distracting. This is of course done due to the fan art backgrounds and to increase readability of the title, though simply shading the box with a semi-transparent dark background may be better suited to the theme.

posterview

The new Vanilla theme, included as the main feature in the eleventh beta release of Media Browser, is a definite win for Media Browser users. The slick new interface and prominent fan art placement adds much to the cool-factor of Media Browser. The few minor issues with this new theme are easily overlooked in favor of the hot new look and shouldn’t turn off many users of the plug-in. Be sure to go download Media Browser and give it a try if you haven’t already!

Keep up to date on new developments and Media Center plug-ins by subscribing to the Hack7MC RSS Feed! Also, be sure to become a member of Hack7MC Friend Connect from the top of any Hack7MC page.

Tips to Organize Your Movie Collection

Media Center Movie Library
Getting your movie collection into order, especially when you’ve got a rather large one, can be quite the chore. Each movie needs to have it’s own folder, cover art and synopsis information. Getting these to cooperate with Media Center’s native AMG information grabbing can be equally tricky. These tips can get you on your way to a great looking movie collection inside Media Center’s native Movie Library as well as the popular movie plug-in Media Browser.

Get some structure

The first step to getting your collection into shape is to get your folder structure together. If all your movies are just clumped into a single folder there’s a simple .bat file that can get things into top shape. Just download this movie organizing .bat file and place it in your movie folder. It will take the filenames of your movies (and any extra subtitle or similar files), create a directory with the same name and place all the files inside.

Find cover art and details

Finding cover art and synopsis information for each of your movies is going to be slightly trickier. There are several tools which can assist in getting the proper files downloaded, though many of them don’t quite work as well as they did in Vista Media Center.

DVD Library Manager

The first such tool, DVD Library Manager, works fairly well for retrieving cover art and even editing the details of each movie. DVD Library Manager can automatically retrieve movie information from Amazon or IMDB, including the ability to save cover art as a folder.jpg file to each movie’s folder. This handy little tool can save quite a bit of time but the xml files created aren’t compatible with all features of Media Center, such as AMG information retrieval.

To get the most out of the native Movie Library you will need to use a resource like DVDXml.com. Sign up for DVDXml.com to be able to search for and download Movie Library compatible XML files for each of your movies. Downloading one of these XML and placing it in each movie’s folder will allow Media Center to automatically retrieve cover art and movie details, including AMG information. Though this method does produce better results in the native Movie Library it does not allow you to edit the details. Choosing the right solution for you, or a combination, is key to getting the best of your collection.

Media Center Movie Library Details

Extra tips for Media Browser

For those of us using Media Browser for our movie collections there are a few additional steps we can take to beef up our collection’s display. For instance, add actor images to the movie actors display inside Media Browser using ImagesByName and the collection of images already compiled by the group on Google Code. Go even farther and add encoding information to Media Browser by using the MediaInfo project and adding the right .dll to your Windows system directory.

Media Browser Actor Images

While you’re at it you may also want to take a look at your TV series  collection inside of Media Browser. Take a look at MediaScout, this handy program will help you retrieve all your series information in one easy to use application. Recent build of MediaScout even add support for movie collections, though it’s not as beefy as some other options.

Join Hack7MC's Readers!

Once you’ve gone through these steps you should be well on your way to having a more enjoyable movie collection on your Media Center. Restart Media Center to find your newly organized movie collection along with cover art and synopsis information. Media Browser users of course will have a few added features over the native Movie Library. Either way you go you’re movie library will be looking good from now on.

Be sure to tune into regular updates from Hack7MC via the RSS Feed or follow on Twitter.

Actor Images in Media Browser

Application One of the best hidden features of Media Browser is the ability to add images for just about anything you have metadata for. Certainly you’ve noticed when browsing through your movie collection there is an actors tab for each movie. However, once you click this tab you’re greeted with a number of actor’s name with question mark icons by them. Luckily there’s a way to change all that.

The first thing you are going to need is images of all those actors you want to see mug shots of. I know what you’re thinking, there must be thousands upon thousands of images you need to get. Don’t worry, someone else has done a lot of leg work for you already.

Media Browser Actors Images

The ImagesByName Google Code Project has already done a great job of starting a downloadable archive of not only actor images but movie studios and genres as well. To get started all you need to do is download the files, for example “R11_ImagesByName_Peoples.part1.exe” and “R11_ImagesByName_Peoples.part2.rar”, from the Google Code site then extract them to your hard drive.

Once they’re extracted you will need to copy all those actors’ folders into a main folder for Media Browser to access. The normal location for this directory is “\ProgramData\MediaBrowser\ImagesByName\”. Make sure that your folders are in the root of this directory, not in an actors subfolder, or Media Browser will not find them correctly. Once you’ve got your ImagesByName folder you will need to set the directory in the Media Browser config.

Currently, the Media Browser configuration program doesn’t include support for setting the ImagesByName directory so you will need to open the xml config file in notepad. To find the config use notepad to open “\ProgramData\MediaBrowser\MediaBrowserXml.config”. You should see a tag labeled “<ImageByNameLocation />”. Remove the slash from the tag and after the tag type the location of your ImagesByName folder. Afterwards enter the closing tag, “</ImageByNameLocation>” and save the file.

MediaBrowser ImageByNameLocation

If you’ve done everything correctly that should be all there is to it. Restart Media Center and enter Media Browser to check that the new actor images are being displayed.  If not double-check that your “ImageNameByLocation” value is correct and be sure that each actors’ directory is under that folder, not inside any other subfolders such as “actors”.

For more Media Browser tricks check out how to get TV Series Metadata with MediaScout and Encoding Information inside Media Browser.

Auto-Sort Movies into Folders

Many of us start our movie collection as a group of movies, unorganized into their own folder just laying in a single directory. However, in Media Center and Media Browser this doesn’t quite cut it. Each movie should be in a self-titled directory with any of the subtitle and cover images included.

For those of us with large unsorted movie collections this could present an investment of time we’re not willing to make. This could potentially even prevent us from using Media Center to the full potential. Luckily that doesn’t need to be the case!

Unsorted Movie Folder

Jon, from theHTPC.net, has created a small bat file that can be placed in your unsorted movie folder and used to automatically sort all those movies into the proper folder structure. Any of the extras you might have such as subtitle files will even come along.

Newly Sorted Movie Folder

To get started, just download the bat file and extract it in the movie directory that needs sorted out. Make sure any files you don’t want moved are hidden (right-click > properties > Hidden checkbox) including the bat file. Make sure each file in the directory is ready to be moved (this will move ALL files in the directory unless they are marked hidden or read-only).

Double-click file2folder.bat and off you go! (If you can’t see the file make sure you can see hidden files by checking Folder Options in the Control Panel) That should be all there is to it. Enjoy your newly sorted movie folder.

Media Browser’s New Config App

Not familiar with Media Browser? Check out this article on Trading Movie Library for Media Browser!

One of the fastest up and coming movie browser plug-ins for Windows 7 Media Center, Media Browser has recently gotten an exceptionally nice overhaul to it’s configuration interface. The newest beta (2.0.9.0) includes a new application built on Windows Presentation Foundation that allows users to set up Media Browser from outside of Media Center.

New Media Browser Configuration

The little program includes the ability to set multiple watch folders and even assign images to the folders. This is quite an improvement over previous versions that only allowed users to set a single starting directory and left image handling up to Windows’ built-in folder.jpg usage. Unfortunately, at this point it doesn’t include support for edit your movie information such as images and other metadata. Hopefully this feature is being considered for future versions.

Aside from setting up your movie collection folders the configuration includes the ability to setup support for extenders using Transcode360. You are able to set whether or not Media Browser should use Transcode360 as well as what file formats are natively supported by your extender.

Media Browser Configure Extender

On top of this new program Media Browser Beta 9 also includes a number of fixes from previous versions. You can read the full release notes on the Media Browser site right here. Special thanks to Simon from The Digital Lifestyle for the heads up about the update.

Media Browser First Run

Check out the original article on Trading Movie Library for Media Browser as well as adding TV Metadata and Encoding Information to Media Browser!

Encoding Info Inside Media Browser

Thanks to Simon at The Digital Lifestyle for this tip on not only checking what encoding your video files are using but also adding that information to Media Browser as well. Unfortunately, Media Browser doesn’t let you sort out your HD from your SD videos but at least you will be able to tell which is which from inside Media Center.

Media Browser Encoding Information

Getting this hack going is simple. First go to Media Info and download the proper version of the program for your Windows. There is a version available for both x86 and x64 systems, make sure to get the correct version. If the wrong version is used for this Media Browser will suffer from frequent crashes. Sadly, the x64 version doesn’t include a GUI for use in Windows but the x86 version will serve that purpose just fine.

To install the media info to work with Media Browser get either the GUI version (if on x86) or the dll version zip (comes in both x86 and x64). If using the zip: open the zip file and extract “mediainfo.dll” to the “/Windows/system32/” directory. For the GUI version: install the program then locate the “mediainfo.dll” in the programs folder and copy it to the “/Windows/system32/” directory.

That’s all there is to it. Open up Media Center and go into Media Browser. You should now see the extra video information including resolution, format and codecs.

Media Browser Encoding Information Details View

As an added bonus (actually intended purpose of Media Info) installing the GUI allows you to check the encoding of your various video files from windows. Using the Media Info program is fairly straight forward. Simply open the program and select the file to get information from after setting a few preferences on the first run.

HD Video File Encoding Information

More on that perhaps in another article. For now enjoy your new Media Browser functionality and be sure to tune into the Hack7MC RSS Feed or Follow on Twitter.

Like this guide? Pass it on using the Share This link below!

10 Steps to a Better Media Center

10 Steps to a Better Media Center

Setting up your Windows 7 Media Center is easy, making it your own can be easy too. Here are 10 simple steps you can take to make your Media Center experience more complete, more personal, more enjoyable.

  1. Add ClearQAM to Your TV Listings
  2. Add Custom Apps to Your Extras Library
  3. Do It Better – Add Apps with Custom Icons and Details
  4. Add MKVs to Your Movie Library
  5. Use A Better Movie Library – Media Browser
  6. Expand Your Sound from Stereo to Surround
  7. Play Your Music in FLAC
  8. Check Your Local Weather
  9. Listen To Online Radio through Shoutcast
  10. Add Boxee Streaming TV to Your Media Center

These 10 simple hacks will create a better Media Center for you and your family to enjoy. Don’t forget to check back to Hack7MC to get the latest hacks for your Windows 7 Media Center.

Keep in touch: Bookmark Hack7MC on Del.icio.us, subscribe to the RSS Feed or even Follow along on Twitter.

MKVs for Minimalists on Windows 7

FFDShow Installer Logo Sure there’s nothing wrong with codec packs, Shark007 and CCCP are wonderful products, but there is something to be said for keeping it simple as well. This guide will take you through the minimum steps to install a nice clean setup with the minimum software required to play MKVs and many other less popular codecs as well. For this setup we are going to install only FFDShow and Gabest’s MKV splitters for x86 and x64 if that’s what your running.

Step One: Download a copy of FFDShow Tryouts from here. Those running an x64 version will also need the x64 SVN here. Install the right ones for your system, the latest versions will work.

Step Two: Download Gabest’s Matroska Splitters. There is a version of Gabest’s with an installer for x86 here and x64 here. To install simply extract to your C:\ root drive and right-click to run “gabest_splitter_enable.cmd” as administrator. You should receive one confirmation on x86 and two for x64 versions.  To uninstall simply run “gabest_splitter_remove.cmd” as administrator.

Step Three: Enable viewing of MKV files in Windows Media Player and Windows Media Center by downloading either the x86 registry file or x64 registry file and double-click to add it to your registry. Allow it to be added when prompted. Restart your machine.

That’s all there is to it, this will take you from a clean install to playing MKVs and more in no time at all. For details on using FFDShow Audio settings for your live TV and DVDs in Media Center check this article.

Media Center Movie Library

If you have trouble viewing your MKVs in Windows Media Center or Windows Media Player, try deleting your “C:\Users\YOUR-USERNAME\AppData\Local\Microsoft\Media Player\CurrentDatabase_371.wmdb” file. To enable this file to be deleted you will need to stop the WMPNetworkSvc service from the task manager (ctrl-alt-delete).

Trading Movie Library for Media Browser

Windows 7 Media Center’s Movie Library is good, certainly much better than it’s predecessors, but still somewhat lacking. Features like fanart and automatic retrieval of metadata have long been standards in other media center applications. While 7MC has come a long way these features are still sorely missed.

This is where a plug-in called Media Browser comes in. Media Browser provides an alternative to the default Movie Library by scanning a your video folders and letting you browse a folder based structure instead of simply piling everything into one section. Just this makes Media Browser a worthwhile download for anyone who has several different types of videos such as Movies and Television Series DVDs.

Media Browser First Run

On the first run there is a prompt that allows you to set some basic options that can also be changed through the user interface later on. Set the startup folder to the base folder for your movie collection and Movie Browser will begin to scan for content. This is where Media Center really begins to kick.

Movie Browser HD Movies Listing

Not only will Media Browser display a list of your movies in several different display formats it will also automatically retrieve information for each of your titles. As long as your folders have the appropriate name for the movie a good amount of metadata including covers, description, fanart, actors, genre and more will be pulled down without having to do any extra work. This setup is much easier than locating dvdid.xml for each of your titles for the default Movie Library. It’s not a perfect system however, small differences in titles can be the difference between getting the correct metadata and getting nothing.

The various display types are easy to cycle through using the menus located at the top of the display. Media Browser can arrange your media on several different criteria from the metadata that has been retrieved. This level of customization ensures each user can find a display that is comfortable and easy to use.

Movie Browser Poster View

While Media Browser has support for TV series metadata as well the base support isn’t quite as solid at this point as the regular movie sections. A trip to the Media Browser forums and you can find several solutions to finding the appropriate information for your series.

Media Browser TV Series

A strong community at present provides even further options for customizing the plug-in. There are several programs provided from forum goers for doing any number of tasks such as retrieving TV Series metadata and even HD movie trailers.

Media Browser is definitely a solid solution for anyone looking to move away from the default Move Library to something a little more robust. Though this plug-in doesn’t currently integrate with the main menu in Windows 7 MC it can still be found under the Extras Library and added to the Extras menu from there.

Media Browser Thumbs View

Head on over to the Media Browser forums to pick up your download of this fine plug-in and give it a run on your Media Center today, you won’t regret it. Be sure to check back to Hack7MC for more coverage of this app in the future as well. Follow on Twitter or subscribe to the RSS feed for even easier access!

Edit Movie Details with DVD Library Manager

Acquiring details for your Media Center’s Movie Library can be difficult.  Built-In support for adding this information is slim and complicated, furthermore it can’t be edited by the end user.  You’re stuck with what you get.  There are a few other options like DVDXml.com,  though searching for all those movies on the DVDXml.com website can get tiring. Fortunately, there is another option: DVD Library Manager.

DVD Library Manager Movie Info

DVD Library Manager allows you to download movie information from Amazon or IMDB then save the movie details and even cover art to your media center.  Even better, you can edit the information once it has been entered into the system.  Managing your movie information with DVD Library Manager is a snap.

Before using DVD Library Manager, however, you should know that it will only pick up movies with a folder named “Video_TS” inside.  You can add this as a blank folder under each movie folder, for example “C:\Movies\Movie Title\Video_TS”. After using DVD Library Manager, however, you will most likely need to go back and remove this folder from wherever it has been added. An easy way to do this is using the Windows Explorer search box at the top right corner of Windows Explorer.

First, download the latest available version of the program from The Green Button forums right here. Once the program is installed give it an initial run, if your movies are stored in the default Media Center locations you should see a list of movies populate the main view.

DVD Library Manager Loaded Movies

If your movies aren’t loaded into the main view you may need to change some settings by clicking the settings tab on the main toolbar. Once inside the settings you will see the default media locations and a second area for adding additional folders.  Add your movie locations and save your settings.

DVD Library Manager Settings

Once you’ve got all your movies listed inside the main interface you’ll want to go through all the incomplete entries and scan for information. Doing this is quite simple, double-click on any incomplete entries to bring up the details view.

DVD Library Manager Details

Your view will most likely contain missing or incomplete information and may or may not have a cover. To rectify the situation you can scan one of two databases to get new information, Amazon and IMDB. At the time of this article the option for scanning IMDB was not working due most likely to changes in the IMDB site.

DVD Library Manager Movie Search

Once you’ve found the right title and information for your movie you can make edits to the information either in this window or in the previous window.  To save your new information and return to the details window press “Select Movie”. From the details window you can make any edits you wish or select different cover art from another location. Once you’re happy with the results press the “Save” button on the details toolbar.

Windows 7 Media Center also has the ability to pull down further information from the internet for your movies from inside Media Center.  This function seems to work best when your movie’s title contains no additional information such as “widescreen”, “full screen”, “collectors edition”, etc.

DVD Library Manager Showing Covers

Continue on this way until you’re satisfied with your collection’s details.  Each movie will be saved through the details screen and there is no need to save details again in the main view before exiting.  If you’d like to see cover art in the main view as well there is an option under the advanced tab in the main window that will allow this.

DVD Library Manager is a simple way to automate your DVD collection info gathering.  Though it is still somewhat labor intensive it is slightly easier than DVDXml.com.  Whichever method you choose provides much better results than Media Center. Have fun with your newly detailed and polished Movie Library.

Bringing your DVDs to Media Center

Hard drive space isn’t necessarily expensive, that is until you consider the amount of disk space required to archive your 300+ disk DVD collection to your Media Center pc. With each regular DVD clocking in at around 4gb, let’s not even mention bluray disks, the cost can add up quickly.

So what we need is a way to compress those movies while keeping the quality but saving some space (and cash!). This is where a little program called Handbrake comes in. Handbrake is an open-source program free to download from their site for a variety of platforms.

Handbrake User Interface

At first glance the user interface may seem slightly confusing but it’s actually quite a simple affair to get started with some basic DVD ripping (DVD encryptions are not circumvented by Handbrake and will require a separate program such as AnyDVD from Slysoft).

Step one after you’ve inserted your original DVD is to set Handbrake to the appropriate source. To do this simply click the source button located at the upper left hand corner of the interface and select your DVD from the dropdown menu that appears.

Handbrake Source Menu

Handbrake will then scan the disk for track information and select what it believes is the main track containing the movie. If you believe for some reason it has selected incorrectly you can adjust the selection under the drop box labeled “Title.” Then under “Destination” hit the browse button to set the location you want your compressed DVD file to be located.

Next we set our video and audio settings, including the amount of compression we want on our disk. These settings will effect the quality of the file we get back, more compression means a lower quality file being output. Picture settings can typically be left at their default settings unless you have a particular reason for changing a setting such as deinterlacing or noise reduction. Selecting the Video tab will bring up the options for video compression that we will be looking at first.

Handbrake Video Settings

Here we can set either the output size or the average bitrate of the output file we want. Typically a 1/4 compression will result in minimal picture loss, for a typical DVD 850mb-1gb is generally a good range for the target output size. Entering a target size in MB will tell the program to automatically calculate the average output bitrate making our task a little simpler on us. Then we can move on to the audio settings.

Handbrake Audio Settings

On this tab you can select your audio encoding preferences, high quality audio isn’t a problem when encoding DVDs to your hard disk as the audio will only add a few megs to the output size. Selecting AC3 under the Audio Codec drop box will set the output audio to a format that will lose no data from the original DVD and is an optimal setting.

Finally, hit the Start button located at the top and the conversion process will start. A cmd dialog will appear and show you the status of your encoding. This process can take anywhere from an hour to several depending on how powerful your pc and the settings you’ve chosen. Once the dialog has closed your encoding is complete and you can navigate to your destination directory to give it a play and be sure the output is to your liking.

There are a large number of additional options in Handbrake not covered here that you are free to play around with including a number of presets on the right hand side. At this point, however, that is up to your own experimentation, have fun!

Movie Library Synopsis Info

Adding that extra information to your native Movie Library inside Windows 7 Media Center is currently a cumbersome process for those of us who don’t have the space to store the entire DVD contents to our hard drives. Most of us prefer to use compression such as AVI, MPG or MKV files to store our DVD files to our hard drives saving us both space and money on storage. The problem this presents inside the Movie Library, however, is we lose all that valuable extra information 7MC pulls down from the internet for DVDs.

There is a solution to this problem though. The solution at the moment can be a bit tedious as there aren’t any software solutions that can be used to scrape the proper information to your hard disk automatically like you could formerly do with My Movies. It seems that for now the information that My Movies pulls down isn’t compatible with Windows 7’s Media Center. There is an alternative source for these valuable XML files but it’s a rough ride if you have a big collection.

The best alternative source for the dvdid.xml files that 7MC uses to pull down this extra information is a website called dvdxml.com. As mentioned, however, using this method is far from a simple processes if you have a large movie collection. At present you have to sign up for dvdxml.com then search their database for your movie titles. After locating your movie in their database you simply download the xml file to the folder your movie is stored in. One thing to note with this method is that your movies should also be stored in separate folders, which is generally good practice anyway.

As mentioned, this process can take quite a while for those of us with larger movie collections but at the present it seems to be the only reliable method to collect the proper dvdid.xml files used by 7MC. Hopefully the future will bring us an application to pull down this information automatically and save us some precious time.

Adding MP4 files to Movie Library

It seems that although MP4 file are natively supported by Media Center's codec the Movie Library doesn't show these files by default. To add these files to the Movie Library we will do much the same as we did for the MKV files. Download either the x86 reg file or x64 reg file depending on your version of Windows and save the .reg file to your desktop. Once you have the file double-click to run it, you will be presented with a dialog asking you to verify adding the information to your registery. Select the Yes option in this dialog to add the MP4 registry information. That should be it, enjoy your MP4 files from the Movie Library!

Playing MKVs in Media Center

Don’t like codec packs? Try this: MKVs for Minimalists on Windows 7

The first step to playing MKV (Matroska) video files in your Media Center is to make sure your system is capable of playing MKV files in the first place. There seem to be innumerable ways to accomplish this and everyone has their own preference. For the sake of this small post I'm going to recommend a codec pack. Codec packs are often shunned as being bloated and containing conflicts within their own packages but I've found that the Shark007 Codec Pack is an unbloated and simple solution that just plain works. Currently Shark007 has a codec package specifically for Windows 7 in beta and the x64 Components are well tested and will work in Windows 7 as well.

For Media Center, users running an x64 version of Windows 7 who wish to use the codec pack will need both the codec pack and the x64 components. Users running an x86 version of Windows 7 will only need the basic codec pack.

Remember, there are many different ways to install mkv support on your Windows 7 machine, Shark007's codec pack is just one solution that works in both x86 and x64. There are many other resources around that can help you set up mkv support without codec packs and even alternative codec pack solutions to be used. If you’re looking for a more light-weight install try this guide: MKVs for Minimalists on Windows 7.

The second step is to get those mkv files displayed in Media Center (and Windows Media Player as well!). This step is even simpler than the first. To get mkv files to display in your Movie library all you need to do is install a simple registry fix.

Download either this x86 reg file or this x64 reg file to your desktop then double-click to run the file. A dialog will appear asking you to confirm adding the file to your registry, click to allow. Then restart your computer and voila! mkv files should now appear in your Windows 7 Media Center Movies Library (provided you setup your DVD Library to point to a directory containing mkv files).

Don’t forget to Try our guides on MP4 or Flac files!

Hack7MC Has Moved!

Hack7MC has left Blogspot for a new home. Following the original address @ http://www.hack7mc.com will take you to the new home page.