Encoding Info Inside Media Browser

Thanks to Simon at The Digital Lifestyle for this tip on not only checking what encoding your video files are using but also adding that information to Media Browser as well. Unfortunately, Media Browser doesn’t let you sort out your HD from your SD videos but at least you will be able to tell which is which from inside Media Center.

Media Browser Encoding Information

Getting this hack going is simple. First go to Media Info and download the proper version of the program for your Windows. There is a version available for both x86 and x64 systems, make sure to get the correct version. If the wrong version is used for this Media Browser will suffer from frequent crashes. Sadly, the x64 version doesn’t include a GUI for use in Windows but the x86 version will serve that purpose just fine.

To install the media info to work with Media Browser get either the GUI version (if on x86) or the dll version zip (comes in both x86 and x64). If using the zip: open the zip file and extract “mediainfo.dll” to the “/Windows/system32/” directory. For the GUI version: install the program then locate the “mediainfo.dll” in the programs folder and copy it to the “/Windows/system32/” directory.

That’s all there is to it. Open up Media Center and go into Media Browser. You should now see the extra video information including resolution, format and codecs.

Media Browser Encoding Information Details View

As an added bonus (actually intended purpose of Media Info) installing the GUI allows you to check the encoding of your various video files from windows. Using the Media Info program is fairly straight forward. Simply open the program and select the file to get information from after setting a few preferences on the first run.

HD Video File Encoding Information

More on that perhaps in another article. For now enjoy your new Media Browser functionality and be sure to tune into the Hack7MC RSS Feed or Follow on Twitter.

Like this guide? Pass it on using the Share This link below!

TV Series Metadata with MediaScout

While Media Center has no trouble playing back your ripped movies, videos and music there has been no love lost in the between it and TV series DVDs. The Media Browser plug-in for Media Center eases the situation a bit adding support for TV series’ within the plug-in interface. Once it’s in there, however, it still lacks metadata in most cases making it no better than the default video section.

Luckily for those of us with plenty of TV series DVDs there is a simple program to help alleviate the situation. MediaScout will go through the television series folders and track down the metadata for each series and season. Backdrops and posters will be pulled down along with episode information and life will be good again.

MediaScout Metadata in Media Browser

The first step to TV series bliss is to download and extract MediaScout somewhere onto your hard drive. Opening up the program by running “MediaScoutGUI.exe” and going to the settings panel we can see some of the options available. The ability to choose the folder where the television series videos are stored, season folder name and what metadata to pull down off the internet. On the right there is even an option to rename the files once episode metadata is found.

MediaScout Errors

One important item of note is that each video filename must contain a season and episode identifier. It can be anywhere in the filename but must be in the format S00E00 for best results. For example, the first show of the second season would need “S02E01” in the filename. This helps MediaScout find the appropriate metadata info for any particular episode. Videos without this information will lack quite a bit of extra metadata content.

MediaScout Error Free Run

To start fetching the data open the “TV” tab at the top and select “Browse” to choose your TV series location. You can choose to either do one series at a time or a whole directory full of different series’. If the directory contains many different series’ they will need to be in a directory structure with the series name on each folder. The box to enable batch processing beneath the browse input will also need checked. Once you have your directory selected simply press “Fetch Data”.

If MediaScout comes across a series title it doesn’t recognize it will prompt you to choose a series from a list. The program will also list the results in the box at the bottom with episodes that are unable to be properly retrieved marked in red for easy identification. Typically these just have a problem with the season/episode tag in the filename.

MediaScout Choose TV Show

As long as your directories are setup correctly and each filename has a season/episode tag MediaScout should be able to get plenty of metadata for each series. You can easily check some of the metadata retrieved by MediaScout in the Manage TV tab or simply opening up MediaBrowser in Media Center.

Media Browser Espisode Select

Using the poster and new cover flow views in Media Browser won’t display most of the extra episode information picked up by MediaScout. The thumb and detail views do, however, display the episode description and name quite nicely. With a little bit of elbow work your television series setup can rival even the best of movie collection setups with MediaScout and Media Browser.

While you’re expanding Media Center’s capabilities why not add Weather and Shoutcast Radio, too!

10 Steps to a Better Media Center

10 Steps to a Better Media Center

Setting up your Windows 7 Media Center is easy, making it your own can be easy too. Here are 10 simple steps you can take to make your Media Center experience more complete, more personal, more enjoyable.

  1. Add ClearQAM to Your TV Listings
  2. Add Custom Apps to Your Extras Library
  3. Do It Better – Add Apps with Custom Icons and Details
  4. Add MKVs to Your Movie Library
  5. Use A Better Movie Library – Media Browser
  6. Expand Your Sound from Stereo to Surround
  7. Play Your Music in FLAC
  8. Check Your Local Weather
  9. Listen To Online Radio through Shoutcast
  10. Add Boxee Streaming TV to Your Media Center

These 10 simple hacks will create a better Media Center for you and your family to enjoy. Don’t forget to check back to Hack7MC to get the latest hacks for your Windows 7 Media Center.

Keep in touch: Bookmark Hack7MC on Del.icio.us, subscribe to the RSS Feed or even Follow along on Twitter.

Free Streaming TV: The Boxee Preview

Boxee Title 
We all love those boxes, our DVRs, PVRs and Media Center PC setups. The problem with all our boxes are similar: there is never anything on and when there is it has too many commercials.  Even our precious DVRs can’t go back in time to fetch that episode we forgot to setup to record.  Our precious Media Centers are consistently lacking decent internet streaming support for all those stations giving it up online. Now there’s a solution: Boxee. 

Boxee Connecting

The new holy grail of the new age in entertainment is being able to pull down any episode, movie or album we desire from the web and enjoy it immediately. Boxee comes close to that goal, allowing you to pull down media from a slew of online providers including CBS, Comedy Central, Hulu, Joost, Shoutcast and Last.FM.  All those options under one roof, unbelievable!

Getting started with Boxee is about as simple as it gets in the Media Center world.  When you first load up you’ll have to provide some basic login information and then you’ll be taken to a front page that features a social-media feel to it with the ability to display what your friends are viewing/listening to, things you have recently viewed, and recommendations from the Boxee network.

Boxee Social Page 

Navigating to the left hand side of the screen reveals a sliding menu providing you with easy access the various types of content that Boxee handles.  Also on the menu are your user profile which will display your friends and recently viewed items and the settings page.  Starting off on the settings page will allow you to configure your local and network media such as any movies or music you have stored on your hard drive.  There are a number of options for customizing the appearance of Boxee though these seem to be somewhat lacking in their ability to personalize the interface.

Boxee Settings

Now on to the big show, navigating back to the sliding menu and browsing to the video section will give you further choices including Movies, TV Shows, and Internet.  Movies and TV Shows will be loaded from your hard drive and identified by Boxee with Title, Description and a bevy of other information but we’ve seen all that from other media center products in the past.

Boxee Movie Information

The big feature of Boxee is it’s support for a large number of online streaming video sources. From the outset you’ll see that Boxee supports some of the major players that Media Center users have been clamoring to get there hands on for years including Hulu, Joost and Comedy Central. There are also a large number of lesser know channels and undoubtedly support for adding even more channels in the future.

Boxee Internet Videos

Delving into the channels themselves you’ll find that each channel has a custom tailored video browser providing for easy access to each channel’s unique features.  While the Hulu browser gives you fast access to the newest featured content, tv shows and even movies, the CNN channel gives you fast access to the latest news stories and popular picks.  With so many streaming video options a user could easily get lost for days watching their favorite episodes of Futurama.

Joost on Boxee

Browsing through online music and photos is equally impressive.  Options like Shoutcast and Last.FM open your music experience up to a multitude of online radio stations at your fingertips. The pictures section even has online media support with services like Flickr and Picasa. Some services will require further login information including Last.FM, Flickr and Hulu if you wish to view mature rated content.

Last.FM Display on Boxee

With all these exciting features for bringing streaming online media to your Media Center it’s hard to find fault with Boxee, especially considering the software is still in Alpha with only selective release at the moment.  A few snags did come up during our limited run however.

Though Boxee seems to have a well integrated social networking system in place it’s usability is limited at best currently with no easily apparent method for browsing or adding new friends from inside the program. This also tends to put a serious damper on the home page as the content displayed there is primarily based on what your friends and neighbors are viewing.

Early setup of our local media libraries was also slightly difficult if your using anything other than the default Windows media locations. When it came to network media the program wouldn’t allow browsing of the network at all, crashing whenever proceeding to choose our network locations. The settings page can also be fairly confusing at first with only minimal descriptions for what certain items do.

Barring these few issues Boxee provided an exceptional browser for watching streaming TV and listening to our favorite radio stations like Last.FM. The picture quality is almost better than you would expect from an online media source and audio performed flawlessly.

John Stewart via Boxee

All in all, the Boxee experience is an exceptionally good one especially when utilized as an addition to your existing Media Center setup.  The unprecedented access to streaming online media will soon become irreplaceable as more and more users move away from standard cable setups for less traditional media. With the ease of access to more services with more content than any other Media Center application Boxee is sure to become a fast mainstay in the Media Center world.

Be sure to check out this article to find out how to add Boxee to your Media Center setup.

Adding Boxee to Media Center (x86 and x64)

Missing Remote has a wonderful write-up and download available to help those who have been lucky enough so far to get in to the Boxee alpha test. Boxee is a media center style application that has gained popularity for it’s ability to stream video from online sources such as Hulu and Joost. These two services provide a wealth of content including full length shows from many of the popular TV networks and even full length movies. The problem is, how do we get these great features into Windows 7 Media Center?

Boxee in Start Menu

For Windows 7 x86 users they can follow the guide at Missing Remote. Download the original Zip file, made by Missing Remote with help from Andrew Cherry, and extract it to your Boxee installation directory. Once you have a new directory under your Boxee installation (“C:\Program Files\Boxee\BoxeeMCE\”) navigate to that directory and right-click to lauch “InstallBoxee.cmd”. A dialog will appear noting the success of the install.

For x64 users you will need a slightly modified version of the Zip file (Alternative Download). This version allows your to install Boxee to the “Program Files (x86)” location that is the default for x64 users.

The process for getting Boxee onto the start menu is also slightly different in Windows 7 Media Center than it was in Vista. Once you’ve run the “InstallBoxee.cmd” from your Boxee\BoxeeMCE directory open Media Center and navigate to the Extras menu. Boxee should now be listed inside the Extras Library.

Boxee in Media Center

Unfortunately, there’s currently not much information on adding icons to the default menus such as TV or Movies. We can, however, add an icon to the main Extras menu from inside Media Center. To do this simply bring up the right-click (remote button “i”) and click on “Add to Start Menu”. You should now have access to Boxee from your Media Center in Windows 7 x86 or x64!

Be sure to check out the plug-ins section for more great additions to Media Center or Hack7MC’s preview of Boxee!

Adding Weather to Media Center

One of the few things lacking in Media Center has been an easy way to view your local weather without tuning in a news station. Since support for this is still left out in 7MC we have to turn to a plug-in to fill the gap.  Heatwave, originally developed by MCExtended on The Green Button, is an elegant solution to the problem providing an easy access and attractive interface for our weather viewing needs.

Heatwave Weather Display

Setting up Heatwave is also a snap.  You can find both the x86 and x64 versions of Heatwave for Windows7 Media Center for download, here(x86) and here(x64). These have had their install files modified to enable support for installation on Windows 7.  Once install is complete, Heatwave provides a user interface inside Media Center to setup your locations and other details.

Heatwave Start Menu

If your weather doesn’t immediately appear in your main menu you can find a link to the plug-in inside the Extras Library.  From the main screen you can click settings to edit your preferences including measurement displays, appearances and locations.  After saving your settings Heatwave should appear in your main menu unless you opted out of this option. (Note: when saving your settings a warning dialog appears, however settings do save correctly)

Heatwave Location Setup

That should be all there is to it, you should now have easy access to weather from your Media Center interface thanks to this wonderful little plug-in!

Media Center Launcher & Configurator

Yesterday I posted about a simple yet effective way to edit the programs in your extras library. Today I'm going to lead you to a pair of programs that make it simple to add, edit and remove new listings from your program library.

The first is Media Center Launcher, which can be found for download from Mikinhosoft in both x86 and x64 formats here. This handy little program allows you to make edits to the extra library, adding a link to PowerDVD by default (this can be hidden from inside Media Center by right-click and slecting "Hide" if undesired). It will even monitor your remote for the back button command to allow you to quickly exit external programs and return you to media center. The problem, however, is that it has no front end for adding new entries. That's where Media Center Launcher Configurator comes in.

This handy little app can be found on Chad Dyess' Blog here. The idea is to add the ability to edit your extras library listings with a simple gui and this is where both Media Center Launcher and the Configurator begin to shine.

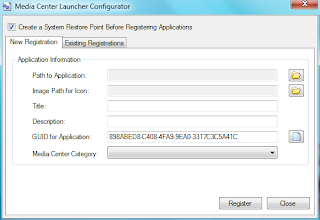
Media Center Configurator New Registration TabAs you can see , unlike the easy method posted earlier, the Configurator allows you to not only link to the application you wish to add but also define an image, title and description to your program. Images can be either a jpg or png located anywhere on your pc, it's not a nessecary field but certainly one of the most compelling for using this method as opposed to the easy method. The program also allows you to choose the category you'd like the program to be placed under which will decide where the program resides within your Media Center gui.

Media Center Configurator Edit TabHere we see the editor for existing entries, unfortunately it only supports the registering and unregistering of previously created programs listings but not the editing of the entries. Another perplexing issue is that removed entries are never removed from the listing though this may have been intentional to allow for temporary unregistering and re-registering. Interestingly, however, if you save a program with the same name as a previous entry the new settings are saved over the old entry. All in all despite these few issues these two programs together make editing your extras library really start to shine.

So go get your copy of Media Center Launcher and the Configurator and start hacking away at your extras library!

Hack7MC Has Moved!

Hack7MC has left Blogspot for a new home. Following the original address @ http://www.hack7mc.com will take you to the new home page.