Creating New Start Menu Strips

Currently, in Windows 7 Media Center, there is no way to edit the default start menu items. In previous versions you were able to add items to the existing strips using a third party program, which made sense when adding a movie or TV plug-in. Unfortunately, Microsoft has gone to some lengths to disable this ability in 7MC. It is still possible to create a couple of custom strips in the start menu though.

New Menu Strip in Media Center

The first step to getting your new menu strip is to choose what programs you want to be on it. These programs have to be already entered into the Media Center’s Extra Programs. You can find a guide on adding new entries to the Extra Programs using Media Center Launcher and Configurator right here. Once all the programs you want to launch from your new bar are installed open a registry editor (start > “regedit” > enter).

Launch RegEdit and Locate "Entry Points"

Once inside navigate to the following location in the left hand tree view:

[HKEY_LOCAL_MACHINE\SOFTWARE\Microsoft\Windows\CurrentVersion\Media Center\Extensibility\Entry Points]

Listed under this key will be a number of id numbers. Each program inside Media Center will have a couple of unique keys to identify that particular program. To find the program(s) you want to add to the menu go through each entry and find the id that matches the title of the program. The title should be listed on the right hand side under an entry named “title”.

Create and Name the New Menu Strip

Once you’ve found the correct program entry select AppId, right-click and select “Modify..”. Now copy the AppId from the text box and close the box without altering anything. Now locate the following registry location:

[HKEY_LOCAL_MACHINE\SOFTWARE\Microsoft\Windows\CurrentVersion\Media Center\Start Menu\Applications]

Then right-click and select “New > Key”. Paste the AppId we copied earlier into the Key name. Next, in the right hand window right-click and create three new strings: “Category, OnStartMenu and Title”. Also create one DWORD named “TimeStamp”.

Add New Entry

Right-click to modify each value, setting Category to the name of your new strip and Title to the name to display in Media Center. OnStartMenu should be set to “True” and TimeStamp is a number value determining the position of the new strip in Media Center.

Add New Programs to the Menu Strip

Once this new strip has been created we need to add entries to it. Locate the following key:

[HKEY_LOCAL_MACHINE\SOFTWARE\Microsoft\Windows\CurrentVersion\Media Center\Extensibility\Categories]

Right-click the key and create a new key under “Categories” with the same name as the Category you set in the last steps. Now go back to the proper key under “Entry Points” as we did above and copy the correct key (not the AppId, this time get the key by selecting Rename and copying from the text box). Then create a new key under your new category with the same name as the program’s Entry Point Id number. I know it sounds confusing, take a look at the image below for an example.

Find the Entry Point Id

Set the Program Information

Under this new key we need to create five new string values: “AppId, Context, Description, Enabled and Title”. Also, create one Dword entry called “TimeStamp. Copy the AppId from the program’s Entry Points listing (AppId value in the right pane) then fill in the Title, Description and Context with any values you want. Title and Description will appear in Media Center while context seems to go unused at this time. The “Enabled” string should be set to “True” so that the item appears in the menu strip.

TimeStamp will control the position of each item in the menu, for example one (1) would be listed before two (2) in the strip. To enter Dword values as a regular number select the “Decimal” option on the right of the dialog.

Then Repeat!

To add more entries to your new menu strip simply add a new key under the category for each program you want to add and repeat the steps above. Each program should have a different AppId, Title, TimeStamp and Description.

Create another new item

If your new menu strip doesn’t appear double-check the Entry Point and App Id numbers for each entry. An improper number in any of these will cause the menu strip to not be shown.

Hopefully someone can create a little program to allow this to be done without all the registry mucking but until then this will do the job. If you do create a program be sure to drop a note in the comments so we can let the rest of the community know!

Stay tuned to Hack7MC for upcoming reviews on plug-ins to add to your new menu strip!

Adding Boxee to Media Center (x86 and x64)

Missing Remote has a wonderful write-up and download available to help those who have been lucky enough so far to get in to the Boxee alpha test. Boxee is a media center style application that has gained popularity for it’s ability to stream video from online sources such as Hulu and Joost. These two services provide a wealth of content including full length shows from many of the popular TV networks and even full length movies. The problem is, how do we get these great features into Windows 7 Media Center?

Boxee in Start Menu

For Windows 7 x86 users they can follow the guide at Missing Remote. Download the original Zip file, made by Missing Remote with help from Andrew Cherry, and extract it to your Boxee installation directory. Once you have a new directory under your Boxee installation (“C:\Program Files\Boxee\BoxeeMCE\”) navigate to that directory and right-click to lauch “InstallBoxee.cmd”. A dialog will appear noting the success of the install.

For x64 users you will need a slightly modified version of the Zip file (Alternative Download). This version allows your to install Boxee to the “Program Files (x86)” location that is the default for x64 users.

The process for getting Boxee onto the start menu is also slightly different in Windows 7 Media Center than it was in Vista. Once you’ve run the “InstallBoxee.cmd” from your Boxee\BoxeeMCE directory open Media Center and navigate to the Extras menu. Boxee should now be listed inside the Extras Library.

Boxee in Media Center

Unfortunately, there’s currently not much information on adding icons to the default menus such as TV or Movies. We can, however, add an icon to the main Extras menu from inside Media Center. To do this simply bring up the right-click (remote button “i”) and click on “Add to Start Menu”. You should now have access to Boxee from your Media Center in Windows 7 x86 or x64!

Be sure to check out the plug-ins section for more great additions to Media Center or Hack7MC’s preview of Boxee!

Media Center Launcher & Configurator

Yesterday I posted about a simple yet effective way to edit the programs in your extras library. Today I'm going to lead you to a pair of programs that make it simple to add, edit and remove new listings from your program library.

The first is Media Center Launcher, which can be found for download from Mikinhosoft in both x86 and x64 formats here. This handy little program allows you to make edits to the extra library, adding a link to PowerDVD by default (this can be hidden from inside Media Center by right-click and slecting "Hide" if undesired). It will even monitor your remote for the back button command to allow you to quickly exit external programs and return you to media center. The problem, however, is that it has no front end for adding new entries. That's where Media Center Launcher Configurator comes in.

This handy little app can be found on Chad Dyess' Blog here. The idea is to add the ability to edit your extras library listings with a simple gui and this is where both Media Center Launcher and the Configurator begin to shine.

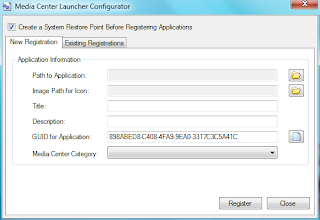
Media Center Configurator New Registration TabAs you can see , unlike the easy method posted earlier, the Configurator allows you to not only link to the application you wish to add but also define an image, title and description to your program. Images can be either a jpg or png located anywhere on your pc, it's not a nessecary field but certainly one of the most compelling for using this method as opposed to the easy method. The program also allows you to choose the category you'd like the program to be placed under which will decide where the program resides within your Media Center gui.

Media Center Configurator Edit TabHere we see the editor for existing entries, unfortunately it only supports the registering and unregistering of previously created programs listings but not the editing of the entries. Another perplexing issue is that removed entries are never removed from the listing though this may have been intentional to allow for temporary unregistering and re-registering. Interestingly, however, if you save a program with the same name as a previous entry the new settings are saved over the old entry. All in all despite these few issues these two programs together make editing your extras library really start to shine.

So go get your copy of Media Center Launcher and the Configurator and start hacking away at your extras library!

Hack7MC Has Moved!

Hack7MC has left Blogspot for a new home. Following the original address @ http://www.hack7mc.com will take you to the new home page.